Robotino3 cpu board
Contents
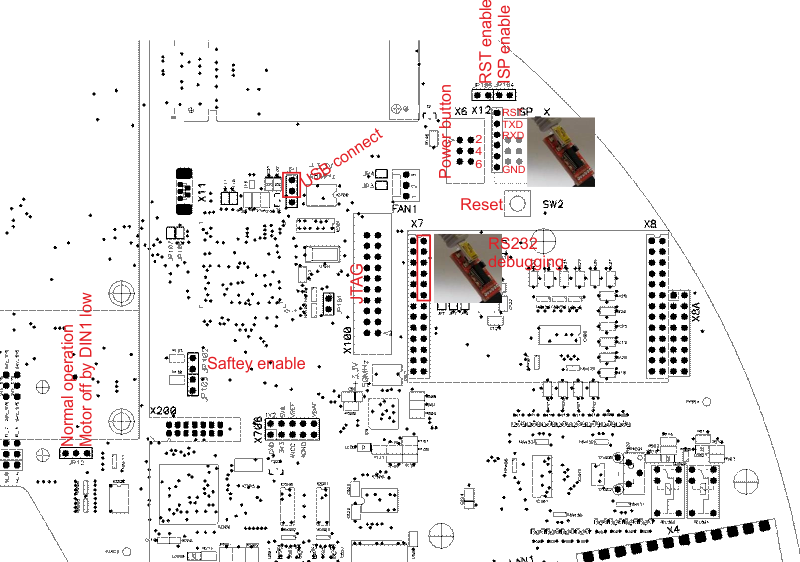
Safety enable
If set DIN1 and DIN2 are checked continuously. If DIN1 is low than Robotino's motors are stopped. If DIN2 is low than Robotino's motors are decelerated to 400rpm maximum.
Motor off by DIN1 low
This is a hardware implemented safety feature. If this jumper is set than all PWM signals to Robotino's H-brigdes are blocked if DIN1 is low.
How to install USB bootloader
- Make sure CPU is powered on all the time by putting a jumper on Power button connector pins 4 and 6. This is the same as pressing the power button continuously.
- Put a jumper on RST enable
- Put a jumper on ISP enable
- Connect the FTDI breakout adapter to ISP_X
- Download the latest USB bootloader HEX file
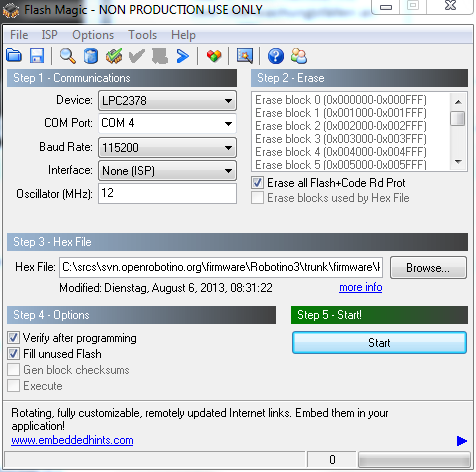
- Get Flashmagic from flashmagictool.com. Use the settings shown below. Replace the path to the HEX file with the path to the previously downloaded HEX file
- After flashing completes remove the FTDI breakout.
- Remove the jumpers RST enable and ISP enable.
Depending on your system setup you can proceed as follows:
SSD is empty
In this case you want to install the Robotino OS via USB stick to the SSD. Press the reset button to start the USB bootloader. This will also allow the COM-Express module to start. Follow the instructions to install OS from USB stick. When installation is finished continue with the following section.
SSD already contains the Robotino OS
In this case you should remove the jumper from the Power button connector. The system immediately powers off. Attach the normal power button and power on the system. The USB bootloader starts. This is indicated by a rapidly blinking power button. The Robotino OS boots up, finds the microcontroller with running USB bootloader and then automatically installs the firmware stored in the Robotino OS.
Remark: The USB bootloader will wait 60s for a firmware installation. If nothing happens for 60s the system is reset. If there is no jumper on the Power button connector the system will power off. Normal boot operation is much faster so 60s timeout is sufficient.
RS232 debugging
115000 baud, 8 data bits, 1 stop bit, Parity none, Flow control off
Putty can be used as terminal.
USB debugging
Remove the COM-Express module. Download the robotino_common installer for Windows. Install and run iocom from InstallFolder/bin.
Connect your PC to the Mini-USB-Connector (X11) between COM-Express module (which is removed) and the microcontroller.

